

How To Set Up Product Photography
13 infinitesimal read
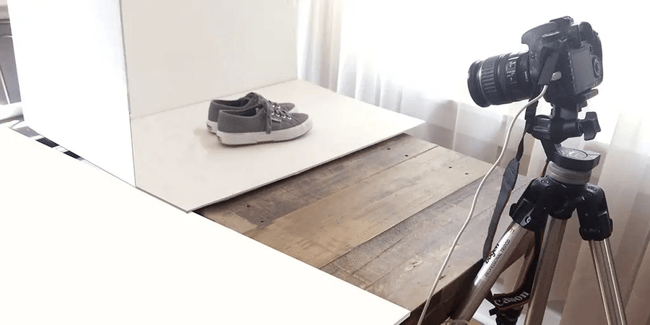
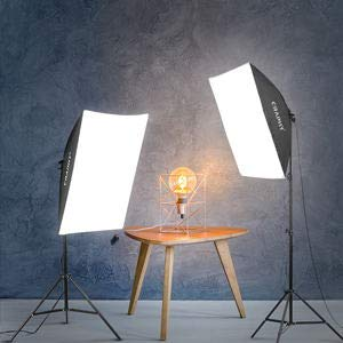
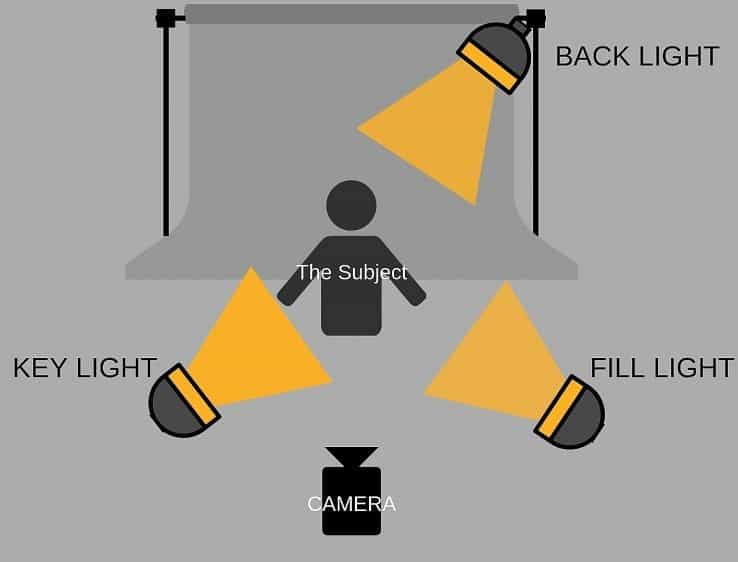
This post was originally published February half-dozen, 2022. Not long agone, production photography was a pricey headache. Every time retailers needed product shots, they had to pay professionals hundreds or even thousands of dollars. Today, anyone tin can take groovy production photos for their ecommerce website correct from their telephone. It costs almost goose egg, just the payoff is huge: more sales. Just ask Etsy: they constitute that xc% of their sales were driven by image quality. The trend makes sense: online shoppers need photos to evaluate products when they can't encounter them in person. The higher the photo's quality, the more confident people will feel about their buy. Don't miss out on sales because of blurry, lackluster photos. This guide has all the product photography tips you need to wow your shoppers and heave your sales. Get our best content on ecommerce marketing in your inbox 2 times a week Good product photos require a good camera. Luckily, today'south smartphones tin can make novices look similar seasoned product photographers. iPhones and Androids are designed to automatically notice the best shot, even when the light is low or your photographic camera shakes, making information technology easy to capture a crisp shot. Yous don't demand to stress nearly technical settings like the white balance or ISO. Smartphone product photos can become by with minimal editing and work well for most online stores. That doesn't mean digital cameras are out of the picture. With more features than a smartphone, digital cameras requite you more control over your production shots. Just exist prepared to practise your homework. You can't take advantage of these cameras unless you've learned their intricacies. Cheque out the recommended smartphones below if your budget and time are limited. We'll too cover a few beginner DSLR options if yous desire to invest in a professional photographic camera. If you're wondering whether you tin use your current smartphone to accept product photos, the answer is probably yeah. Cheque to make sure that your phone's photographic camera has at least 12 megapixels and an autofocus feature (true for well-nigh smartphones on the market after 2022). If yours doesn't, it's time to invest in a new phone. Here are a few smartphone recommendations from TechRadar to consider if you want to take splendid photos: For more smartphone options, check out TechRadar's total selection of 2022's best camera phones. If you desire to go beyond the quality of a smartphone camera, a digital camera – also known as a digital single-lens reflex camera, or DSLR – is the next step. Smartphone cameras are nada brusque of modern marvels, but they nonetheless don't stack up confronting the amount of control, detail, and quality you get with a DSLR. Hither are a few entry-level options, along with suggested lenses. These DSLRs have more capabilities than a phone camera but aren't so avant-garde that they're overwhelming for inexperienced photographers. Recommended lens: Nikon AF-S NIKKOR 50mm f/i.8G ($219.95) It doesn't matter how fancy your photographic camera is – if information technology isn't stable, you could stop up with a blurry shot. The solution is a tripod: a three-legged stand up that holds your camera in place when you shoot. Information technology'southward especially of import to utilize a tripod if you prefer a low ISO – a pop camera setting that reduces graininess (skip to the next paragraph if yous don't want to get technical). A low ISO creates more than blur, though, considering you have to pair it with a dull shutter speed. Photographers rely on tripods to reduce this blur while notwithstanding minimizing graininess with a low ISO. You lot tin can buy a tripod for your smartphone or your DSLR camera for around $15 on Amazon. Ecommerce product photography isn't Hollywood photography. You don't demand massive cameras and a crew to accept high-quality shots. All it takes is a tripod, your phone or DSLR, and products to shoot! But your images can be even ameliorate with lighting and a white groundwork. Natural lighting is one of life's not bad freebies. If the sun's out and you have a space with windows, you have all of the photography low-cal sources y'all need. The one downside is that yous lack command: y'all take to shoot during daylight hours, and fifty-fifty if you do, y'all may have to contend with clouds or lite that'southward also harsh. With artificial lighting, y'all can always create the shot y'all desire, no matter the weather or time of day. It isn't necessary, merely it does ensure you tin can ever accept high-quality photos of your products. The commencement pace of lighting is placement. For natural lighting or direct sunlight, that ways putting your photographic camera, product, and the window at right angles to each other so that the sun illuminates your product without blinding your camera. Now, modify the light using these adjustments: The key to natural lighting is working with the sun. Instead of waiting for a day when the sunlight is merely bright or dim enough, you make modifications until the light is right. Not everyone wants to play the games natural lighting requires. If yous want more control over your shoot, opt for bogus calorie-free instead. All yous demand is a basic 2-lite setup to illuminate your product from both sides. You tin buy these on Amazon for $69. [Source] Brand photographer Misha Hettie recommends using one light as your central calorie-free. "Information technology's the one you aim directly at the production," Hettie says. "All you accept to practice is prepare information technology to 1 side or the other of the camera." The other light is your fill low-cal, which goes on the contrary side of the key light. "It'southward really simply in that location to pick upward where the make full light leaves off, and then reject the intensity or motility it farther away from the bailiwick," Hettie says. If your product has fine edges, like a fur jacket or gemstone jewelry, you lot may as well want to use a tertiary backlight. It'southward placed behind and above the product to highlight its surface details. You can purchase a three-light setup on Amazon for $139. Here'south what the artificial lighting setup looks similar: [Source] There's a reason why most production photos have a white backdrop: white reflects low-cal dorsum onto the product, and then the details are clear. A white background is also easy to retouch in the editing process because information technology's a solid color. To fix a properties, you'll need a "sweep" – something that y'all can hang white paper from. The sweep you utilise depends on your product's size. For small to medium-sized products, you tin use a chair or table equally your sweep. Big products require a stand-mounted sweep, where the product is placed on the floor. Shoot small products – no more than a foot or two wide – on a chair sweep. The setup is simple: just fasten white paper to the back of a chair with spring clamps. [Source] A table sweep for medium-sized products is a like setup. Record white paper to the wall, let it drape onto the table, and place your product on elevation. [Source] If you're using natural lighting, keep in mind that you'll need a wall close to a window for your table sweep to work. The beauty of chair and table sweeps is their simplicity. You can create them in minutes with supplies and piece of furniture you already have. For products that are several feet wide and tall, you'll need a stand-mounted sweep. The easiest just about expensive option is one that is pre-built. This $145 set from B&H comes with the stand, a roll of paper, and a travel bag. If you're shooting products in multiple locations, you'll save yourself a lot of headaches with this on-the-go backdrop. If y'all are planning on shooting in one location and have a small budget, make a DIY properties for large products. The New York Found of Photography suggests hanging a roll of white paper with twine and a hook that tin can hold at least five pounds and taping the ends of the paper to the flooring. [Source] Just keep in mind that you need a white wall for this backdrop to piece of work. Otherwise, your wall's color may appear through the white paper. It doesn't take much to create a white backdrop, and that initial investment lasts for years. Fifty-fifty the shortest rolls of white paper are long, around 20 to thirty feet, and y'all can reuse the paper for multiple shoots. What's the cheapest backdrop setup? $40. A standard whorl of white groundwork paper costs $37. Hanging tools – tape, clamps, nails, twine – should cost $10 or less. Taking pictures of your production from dissimilar angles ensures yous highlight all of the features shoppers might consider before making a purchase. The more views you tin give them, the closer you get to replicating a real-life shopping experience. Hither'due south how Allbirds uses multiple angles to showcase their shoes. Discover how they use a combination of eye-level, high-bending, and low-angle shots – they even show the shoes on a real person. When you're taking photos from different angles, it's best to go on your camera gear up up in the same spot and rotate your production rather than moving effectually with your camera. This ensures your shots accept consistent framing, saving you fourth dimension when it comes to editing. The camera, lighting, and backdrop suggestions we've covered and so far volition assistance you produce high-quality product photos, but they still might non look perfect. Don't sweat it! There'south complimentary, piece of cake-to-utilise editing software available to polish your pics earlier they go live on your ecommerce store and social media platforms. If you're looking for a bones online photo editor, Fotor is the way to become. The tool allows you lot to make a number of simple adjustments to your product photos, similar changing effulgence and saturation. Don't want to handle any effects? Fotor has a ane-tap enhance push that automatically retouches your photo in a click. Every bit you get more comfortable with photograph editing, you may want to try a tool that has more avant-garde capabilities. GIMP is much more than technically avant-garde than Fotor. Beyond basic editing features, GIMP has Photoshop-level capabilities, such as brushes and layers. Bonus: It'south an open-source tool, so developers are constantly updating it. A powerful editing software, GIMP requires some getting used to. Get started with these tutorials. Yeah, Photoshop costs $20.99 per calendar month, but nosotros can't talk nigh photo editing without mentioning this tool. It'due south arguably the most widely used photo-editing software. Photoshop carries a strong reputation because of its powerful features. Digital Camera World says, "Its support for selections, masks and layers is unmatched." Sure, the software is pretty complex, merely the company does a skillful job of guiding new users through the basic features with wing-out animations. It's definitely not a must-take for product photography, only if you're looking for the all-time editing tool out there, Photoshop delivers. If you prefer to edit photos on your telephone rather than a reckoner, there are several photo editing apps you can download. Two of the most popular gratis apps are Snapseed and Adobe Lightroom, which are both loaded with features to level upwards your raw photos. Both of these apps are available for iOS and Android devices. Today, it costs less to fix your ain ecommerce photography studio than to hire a professional person lensman. And for that small investment, you lot accept a much better shot at attracting customers. Utilise this guide to get started with the basics and build a library of crawly product shots. Once yous've established some confidence, try your mitt at more than advanced equipment and techniques. 
ane. Choose The Right Camera
Smartphone
iPhone Pro (model eleven or newer)
Google Pixel 6
Huawei P40 Pro
Digital cameras for college quality product images
Nikon D7200 ($1,099.95)
Canon EOS REBEL T7 ($479)
two. Use a tripod
three. Larn about lighting
Natural light
 [Source]
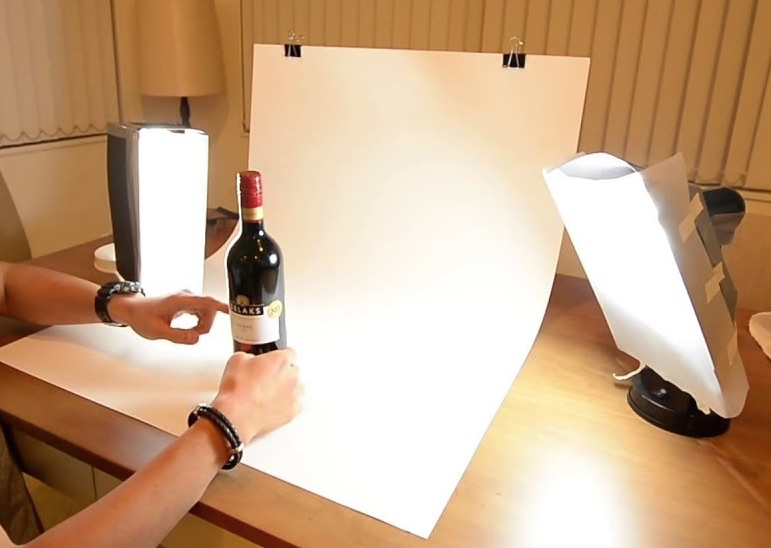
Bogus light
4. Utilise a patently backdrop
Chair or table sweep
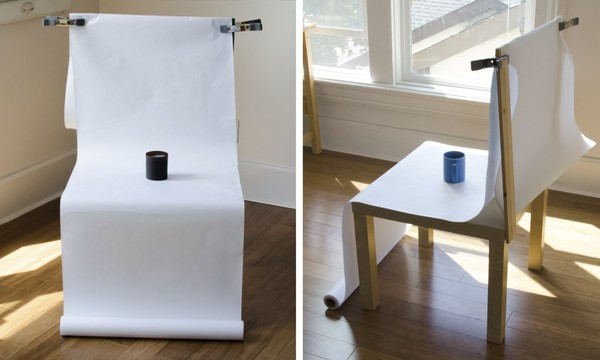
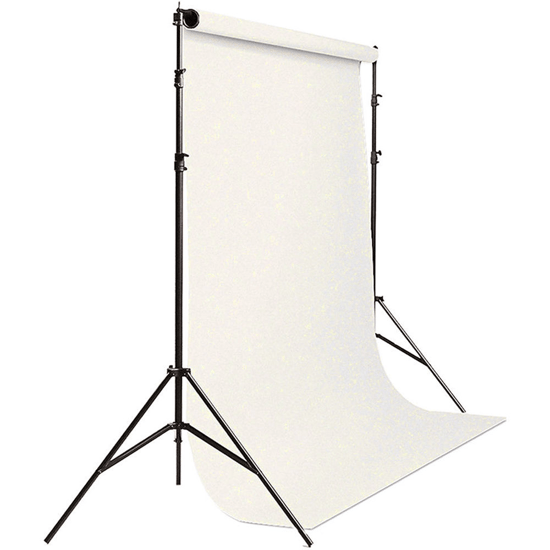
Stand-mounted sweep
 [Source]

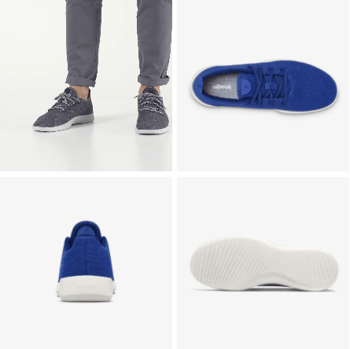
5. Test multiple camera angles
It'due south also important to accept shut-upward shots to emphasize the details of your product, similar the texture, materials, and other elements that shoppers might non notice in a standard picture.6. Selection the right editing software
Fotor
GIMP
Photoshop (Not free, but worth a mention)
Photograph editing apps
Build your ecommerce photo studio for less than $60
Topics: Ecommerce Marketing

How To Set Up Product Photography,
Source: https://www.privy.com/blog/equipment-you-actually-need-to-take-product-photos
Posted by: blossstrable.blogspot.com
0 Response to "How To Set Up Product Photography"
Post a Comment